
Pool Cover Installation Guide
Comprehensive instructions for installing, maintaining, and storing your Doughboy pool cover.
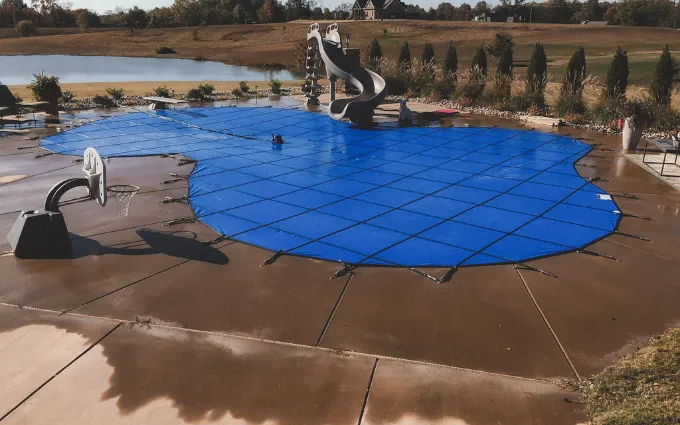
Before You Begin
Important Warning: Confirm all anchor locations before drilling. Remove movable railings, ladders, and other deck obstructions before positioning the cover. Do not place weights directly on the cover material.
Always follow the specifications supplied with the individual cover. Pools with raised walls, rocks, rails, cutouts, or other obstructions may require additional installation considerations. Position and install these areas first.
Included Pool Cover Hardware
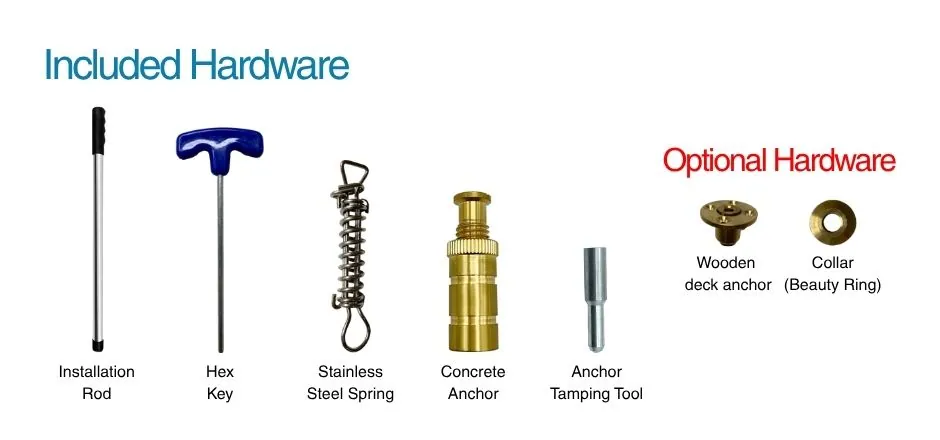
Standard hardware components included with cover
| Component | Purpose |
|---|---|
| Installation rod | Attaching and removing cover springs |
| Hex key | Rotate anchor insert |
| Stainless steel spring | One per strap |
| Concrete anchor | One per strap |
| Anchor tamping tool | Tamp anchors into deck |
| Wooden deck anchor | Optional components for compatible wood decks |
| Collar (Beauty Ring) | Optional components |
Tools and Equipment Required
- Buckets of water or water tubes
- Hammer or mallet
- Chalk and chalk line - will ensure anchors line up
- Tape measure
- Hammer drill
- 3/4-inch carbide-tipped concrete drill bit
- Lubricant - a light oil or silicone spray
Positioning the Pool Cover
- Remove railings, ladders and other obstructions not anchored to the deck.
- Place cover on the deck in the center of the shallow end and unroll to full width. Be careful not to drag or snag the cover.
- The white/translucent chafing strips should be faced down.
- The warning label will be facing up.
- Carefully rotate the cover, if necessary, to properly position the cover over the pool. If there are any cutouts for obstructions on the cover, these areas of the cover must be positioned and installed first.
- The cover should now be sagging into the pool with the material floating on the water.
- Place water tubes/buckets on straps to hold the cover out of the pool.
- Attach all springs to straps by threading the strap through the spring and back through the D-Ring on the Spring. Position the springs to be about 10” from the cover’s edge - adjustments can be made later if needed.
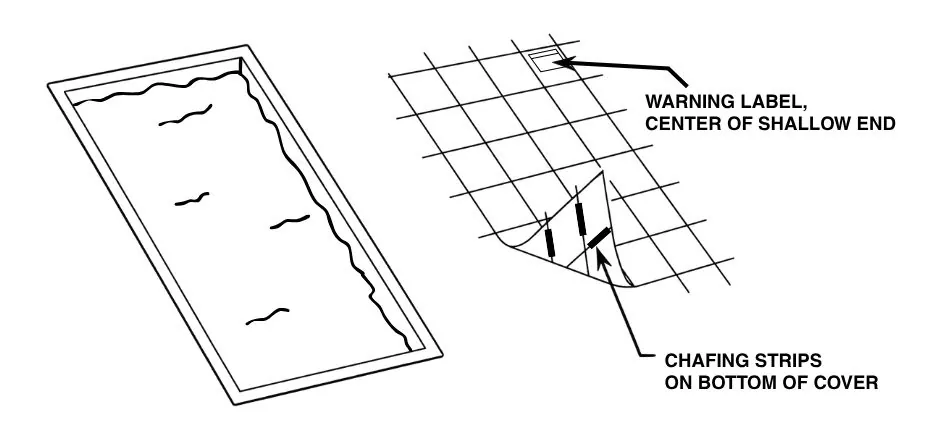
Top-down view of cover positioning over pool at start of installation
How to Install Pool Cover Anchors in a Concrete Deck
| Specification | Measurement |
|---|---|
| Drill-bit diameter | 3/4 inch |
| Screw-type anchor depth | 1 3/4 inches plus drill bit beveled depth |
| Pop-up anchor depth | 2 inches plus drill bit beveled depth |
| Typical anchor distance from pool edge | 32” to 38” |
| Rectangular center-first distance from cover edge | 20” |
| Rectangular corners-first distance from cover corner | 22 inches (plus a 2-inch outward offset) |
| Freeform distance from cover edge | 22” |
Installation Sequence
- Drill holes to accept the anchor shells only after ensuring you have located the proper anchor positions.
- Measure the depth of the bevel on the drill bit and add 2” for pop-up anchors or 1.75” for screw-type anchors. Mark this measurement onto your tamping tool and drill bit with tape (or use a drill guide).
- Carefully remove drilling dust with compressed air or a vacuum.
- Drill a hole with a 3/4” drill bit.
- Lightly tamp the anchor sleeve into position by inserting the tamping tool and lightly tapping it into the deck with a hammer or mallet. A light lubricant on the tamping tool will ensure easy removal.
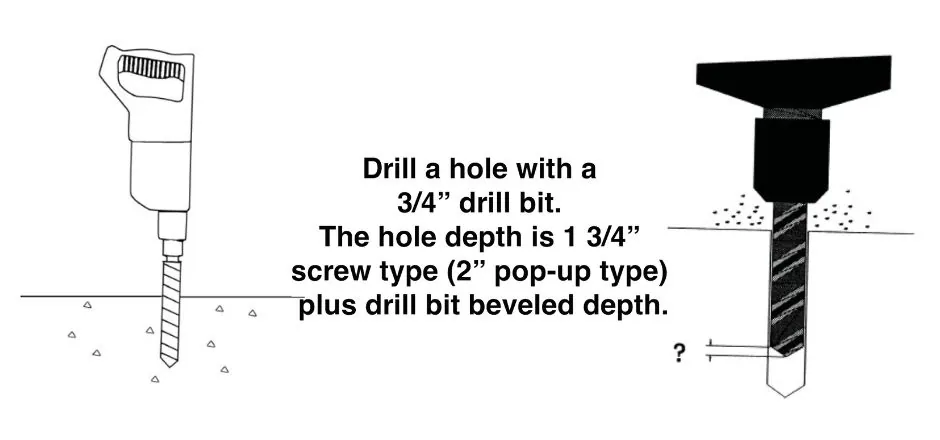
1. Drilling depth specifications
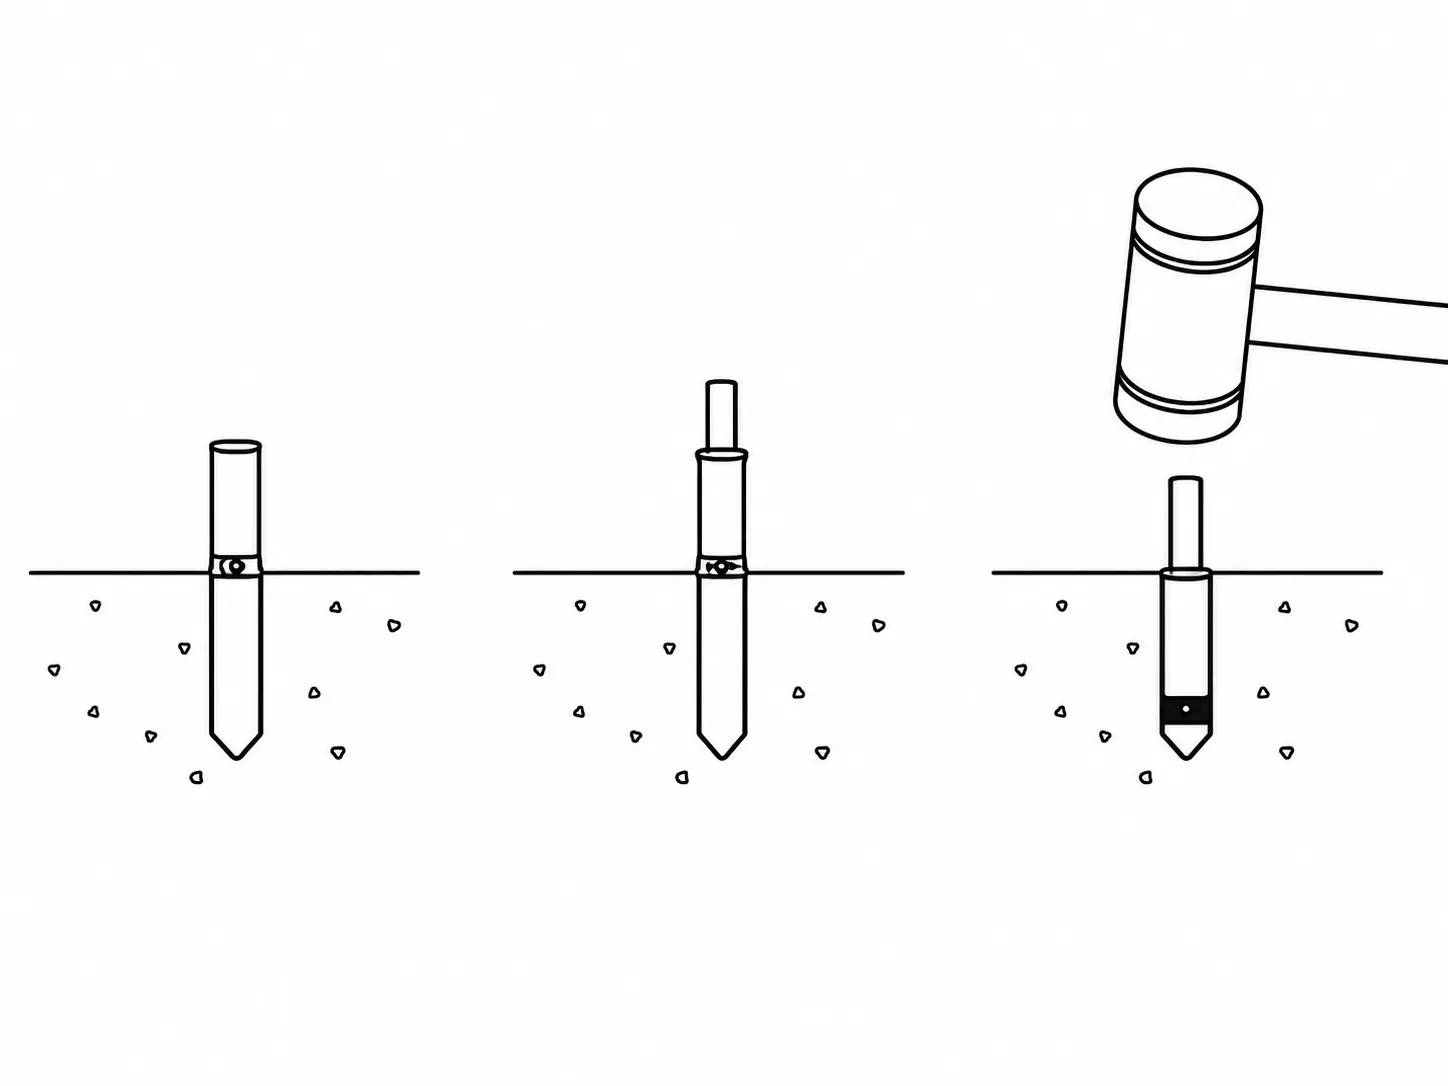
2. Sleeve tamping installation
Rectangular Pool Cover Installation
- Start by anchoring both ends of a center strap (A&B) down lengthwise.
- Install both ends of a center strap (C&D) across the pool width.
- Be sure there is an equal overlap on both sides and ends. For the proper overlap, subtract the pool size from the cover size and divide by two.
- Anchors should be located 20” back from the cover’s edge. The correct anchor distance back from the pool edge is the cover overlap plus this 20”. Typically, the anchors are about 32” to 38” back from the pool edge.
- Repeat process towards corners. Complete installation.
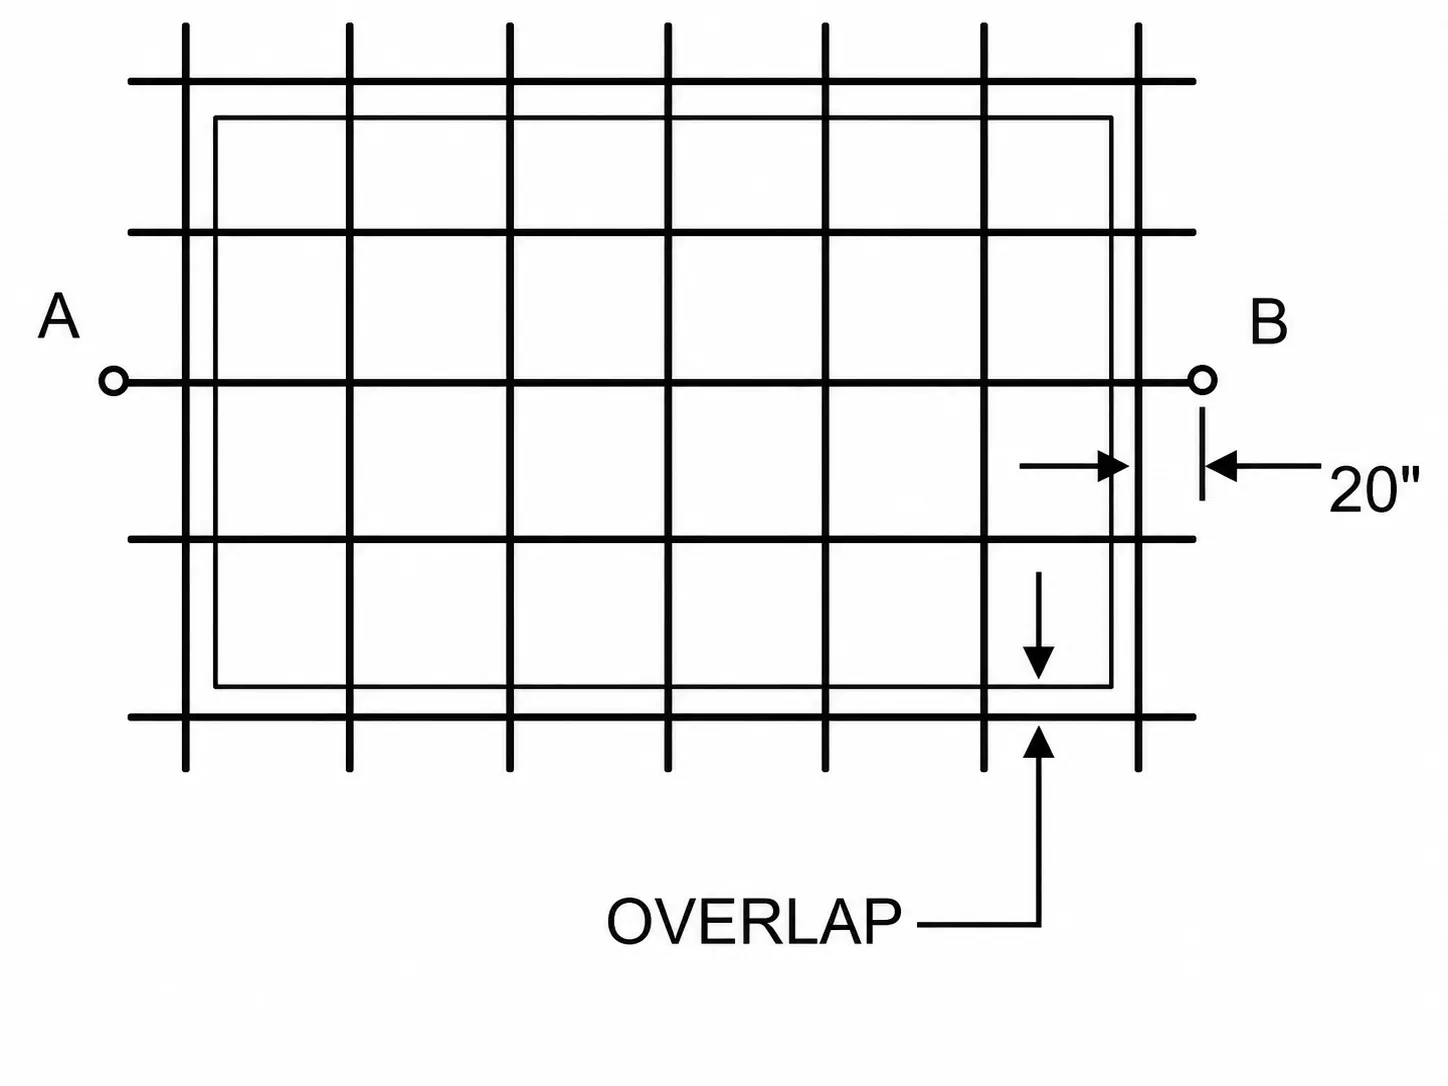
1. Install A & B (Lengthwise)
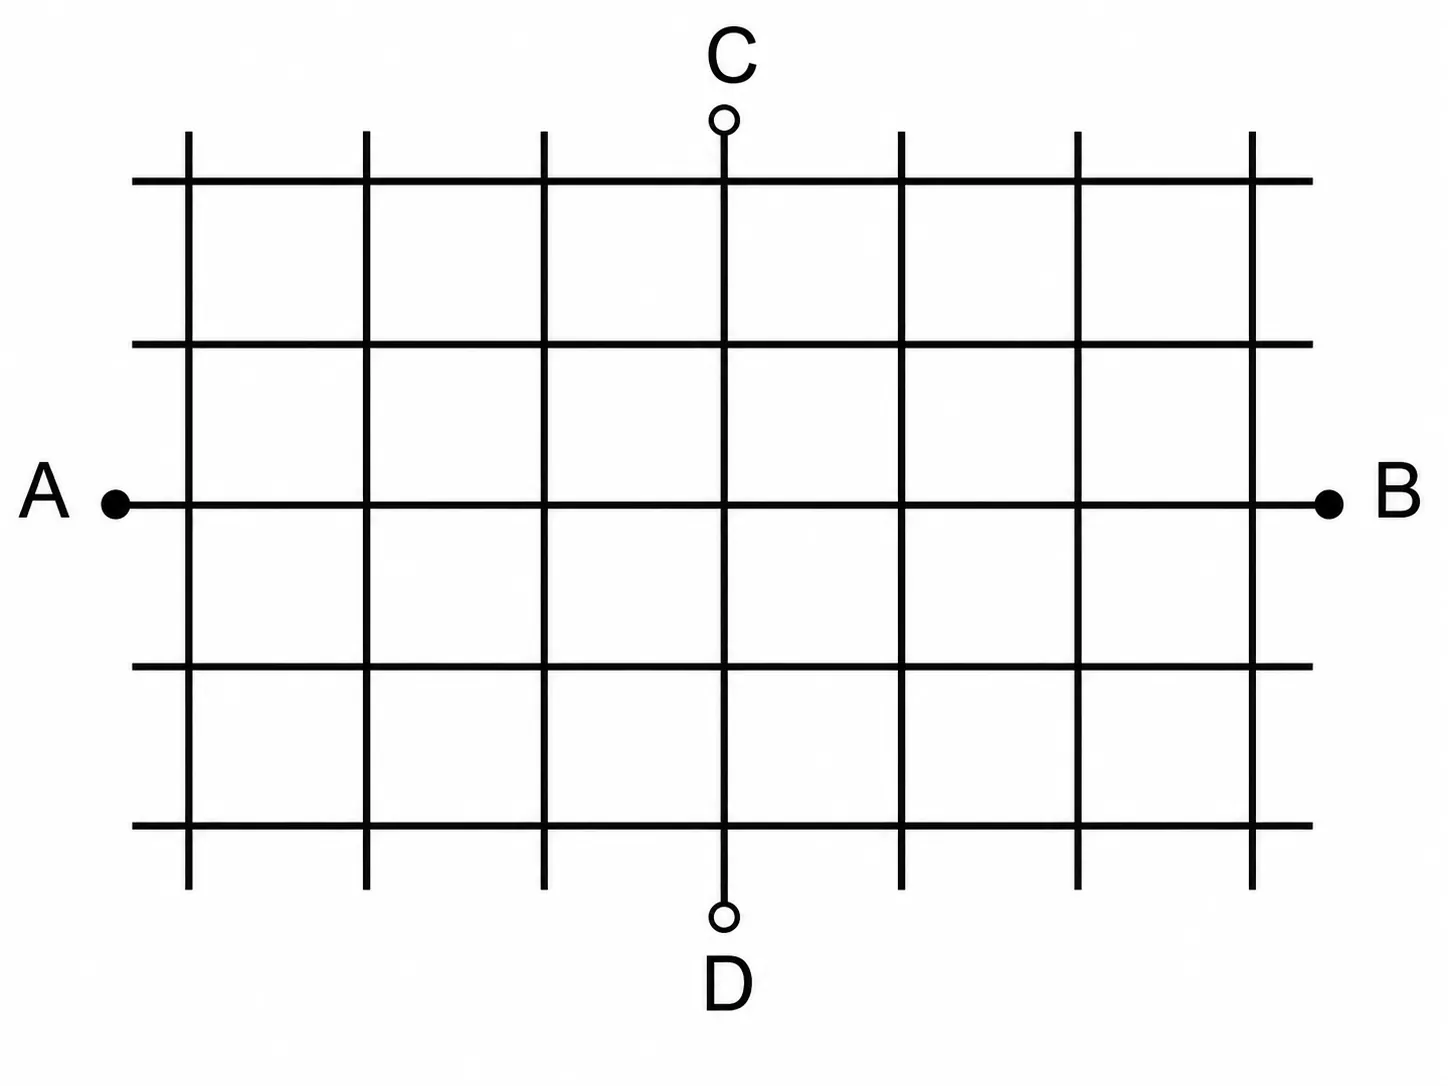
2. Install C & D (Crosswise)
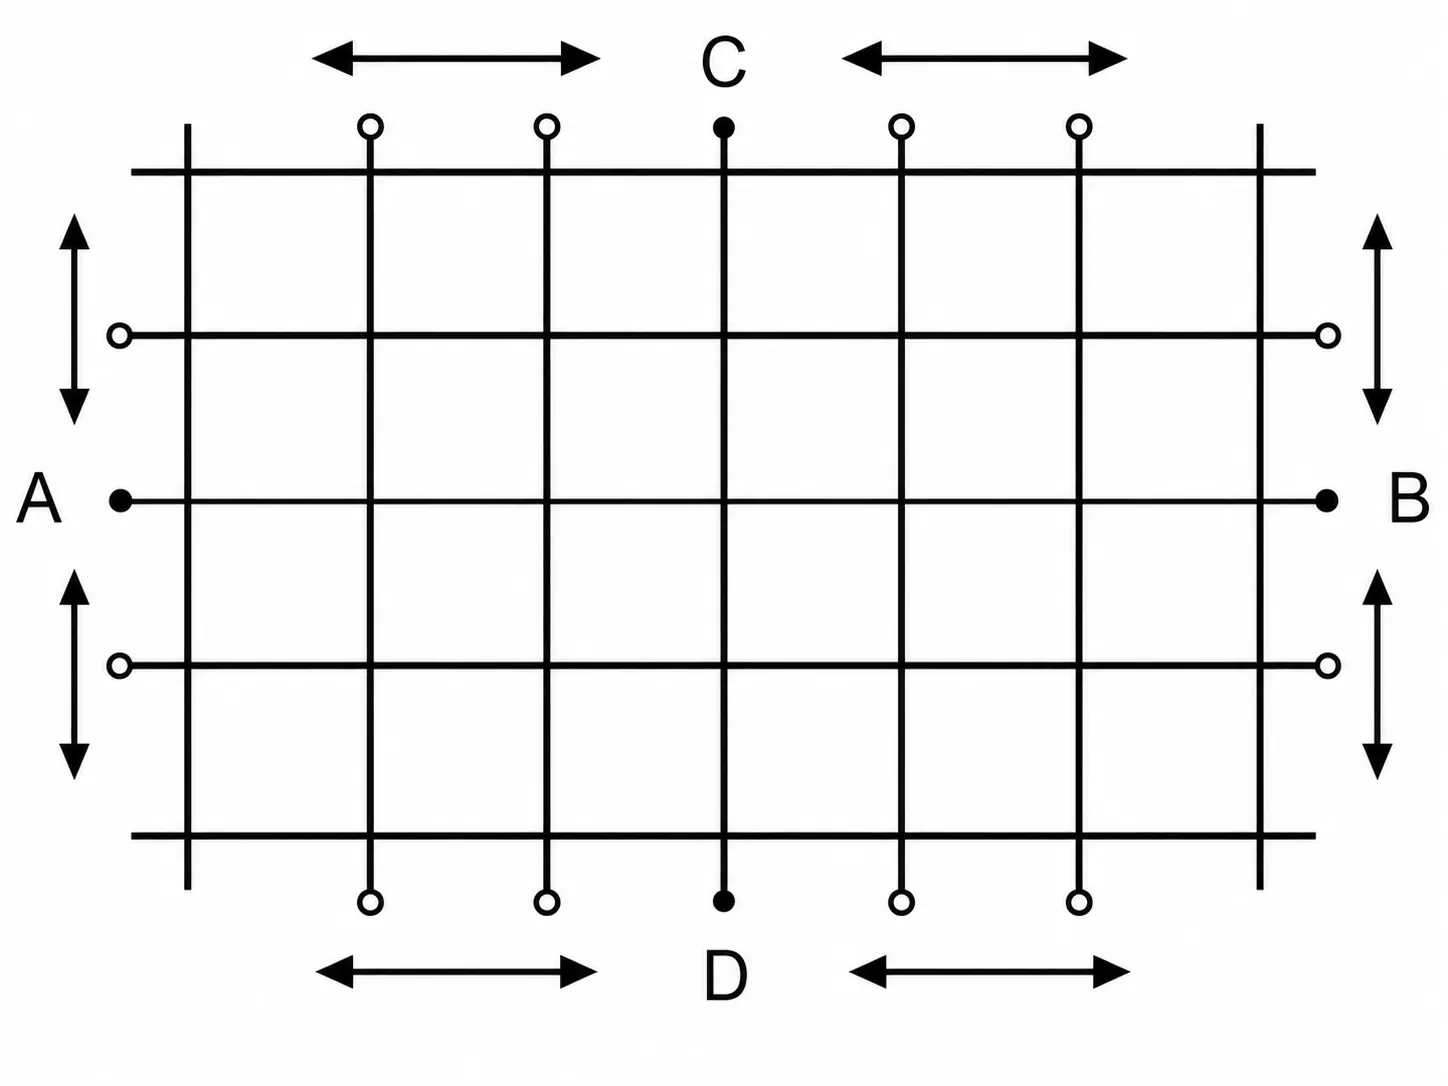
3. Anchor Towards Corners
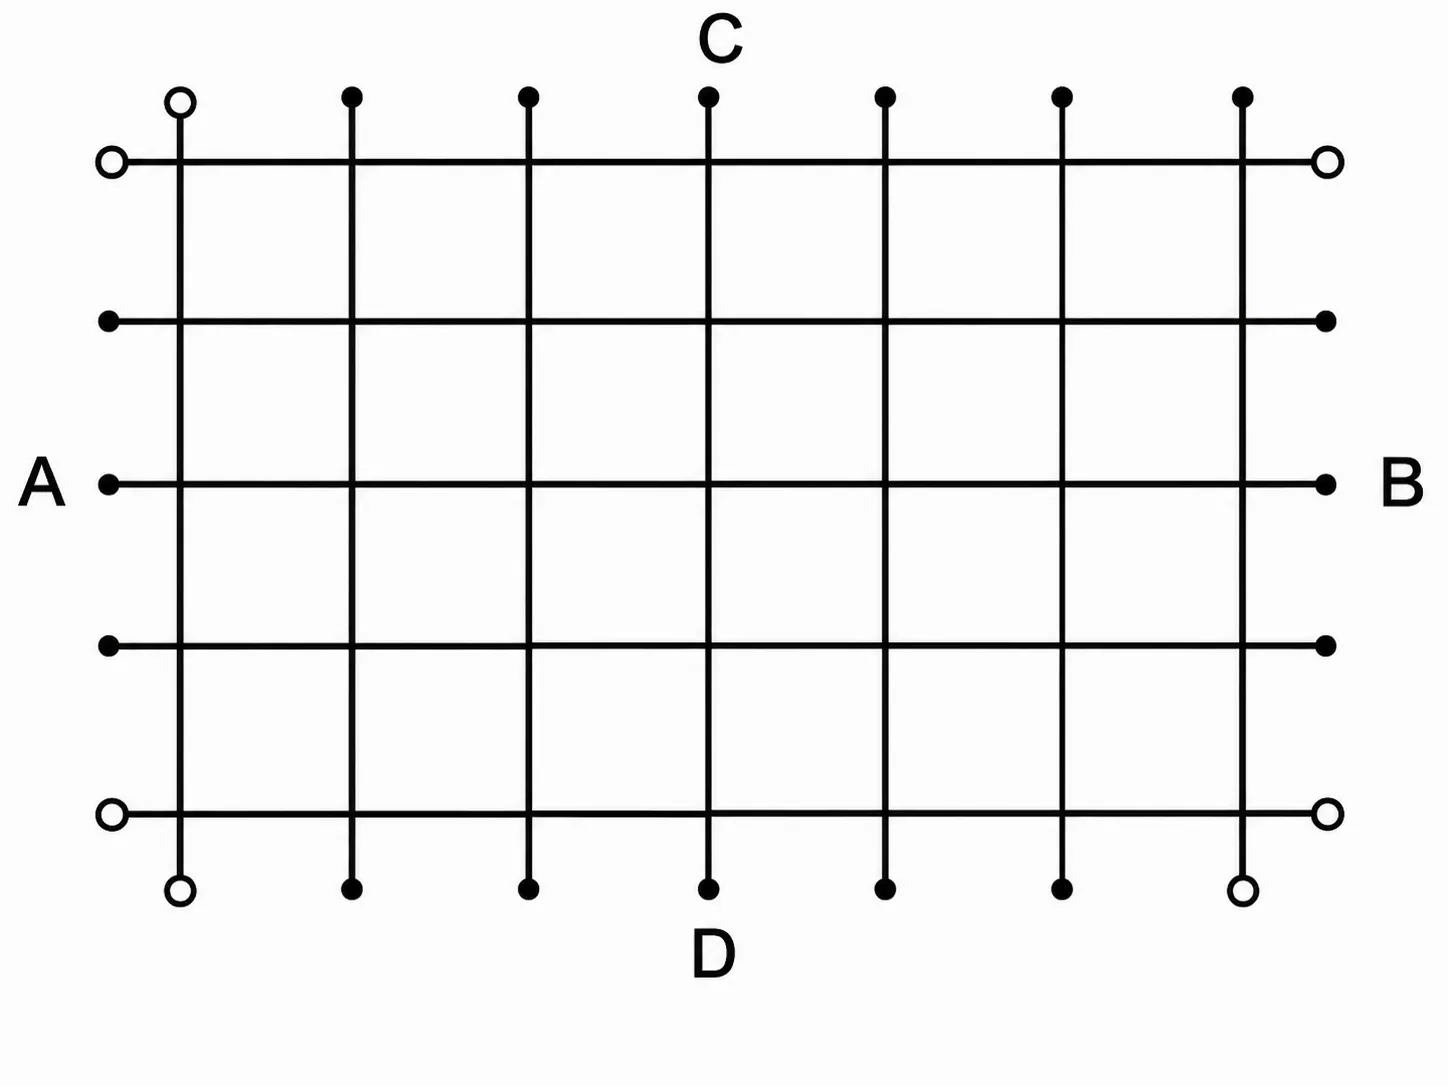
4. Complete Layout Pattern
Alternate Method: Installing the Corners First
- Start by marking the cover corner locations on the deck in chalk.
- Mark the corner anchor locations by measuring 22” out from the cover corner and slightly (2”) away from the center of the pool to allow for eventual cover stretch.
- After installing all eight corner anchors, adjust the strap through the D-Rings for proper tension and equal overlap.
- Using a chalk line or piece of string, mark a straight line between corner anchors on all four sides of deck.
- Install remaining anchors equidistant apart down the length of pool. Be careful to locate the anchor on the chalk line and pull the cover strap perpendicular to the cover.
- Continue to do the same down the width sides of the pool. Straps can be adjusted to alleviate straps not in perfect alignment.
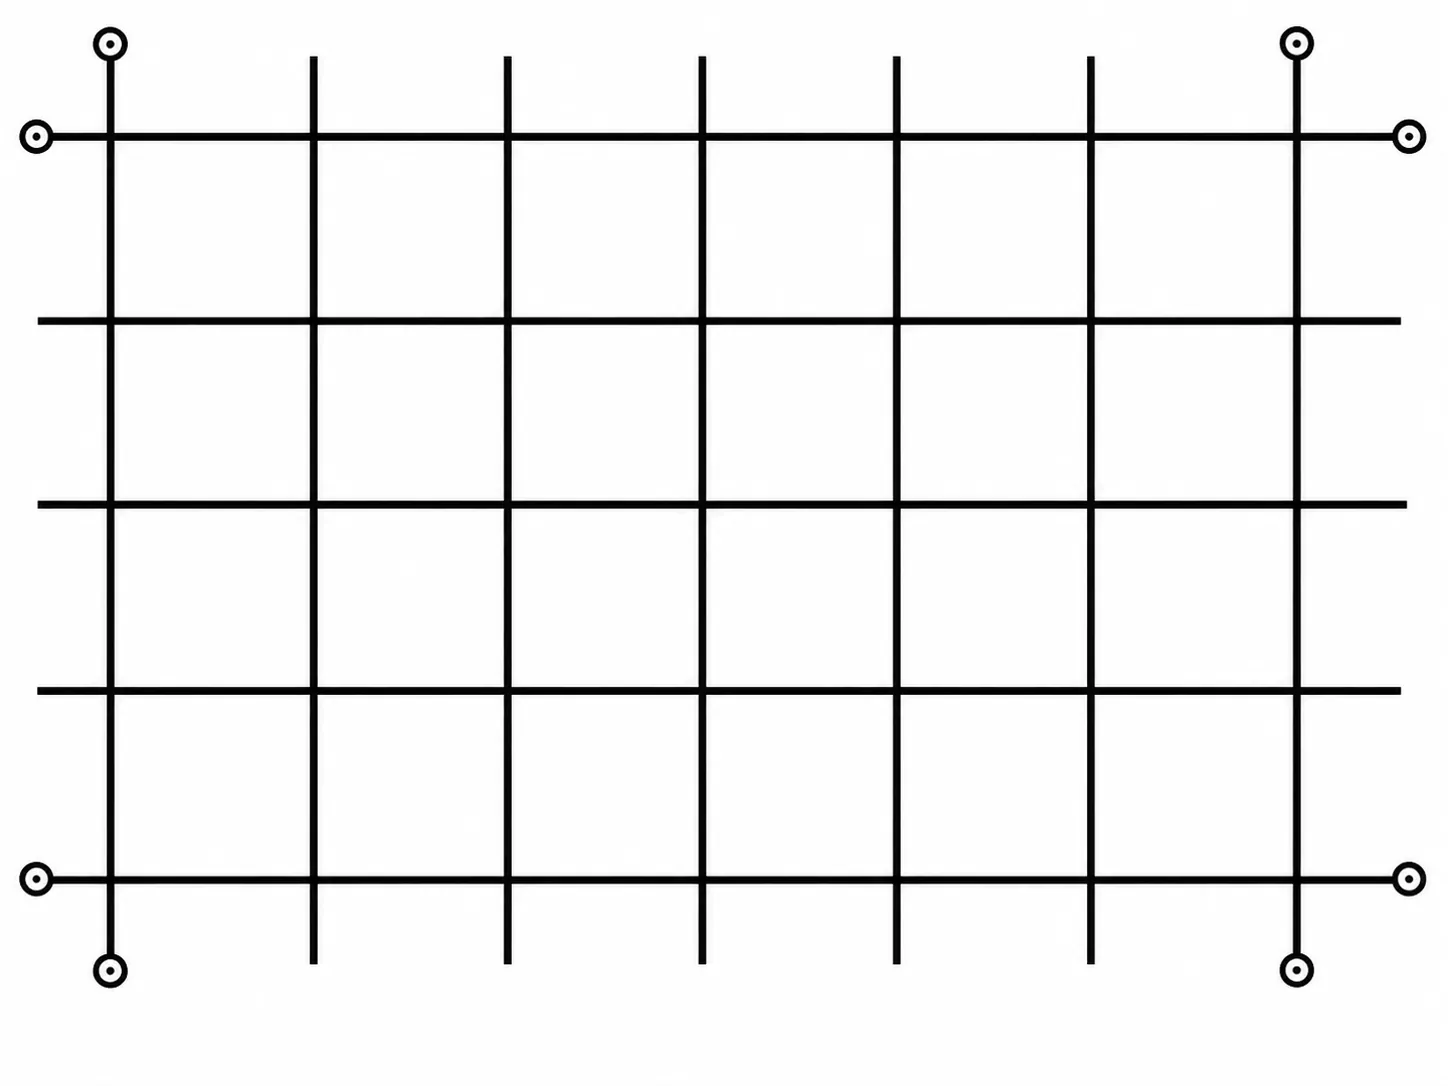
1. Install 8 Corners
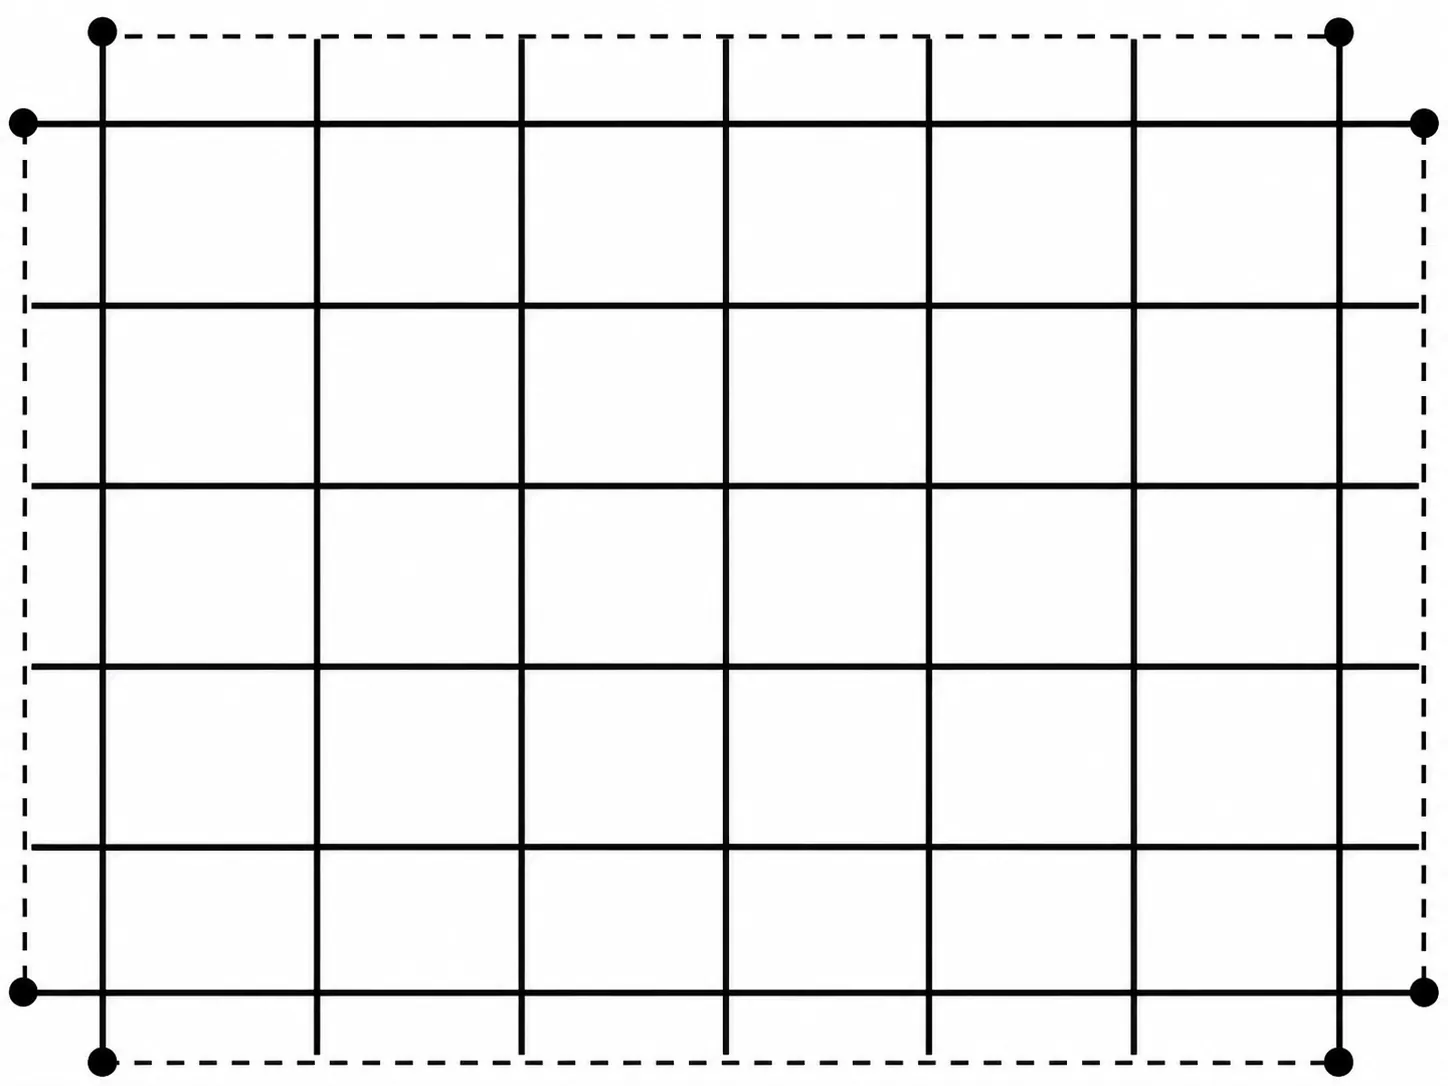
2. Snap Chalk Lines
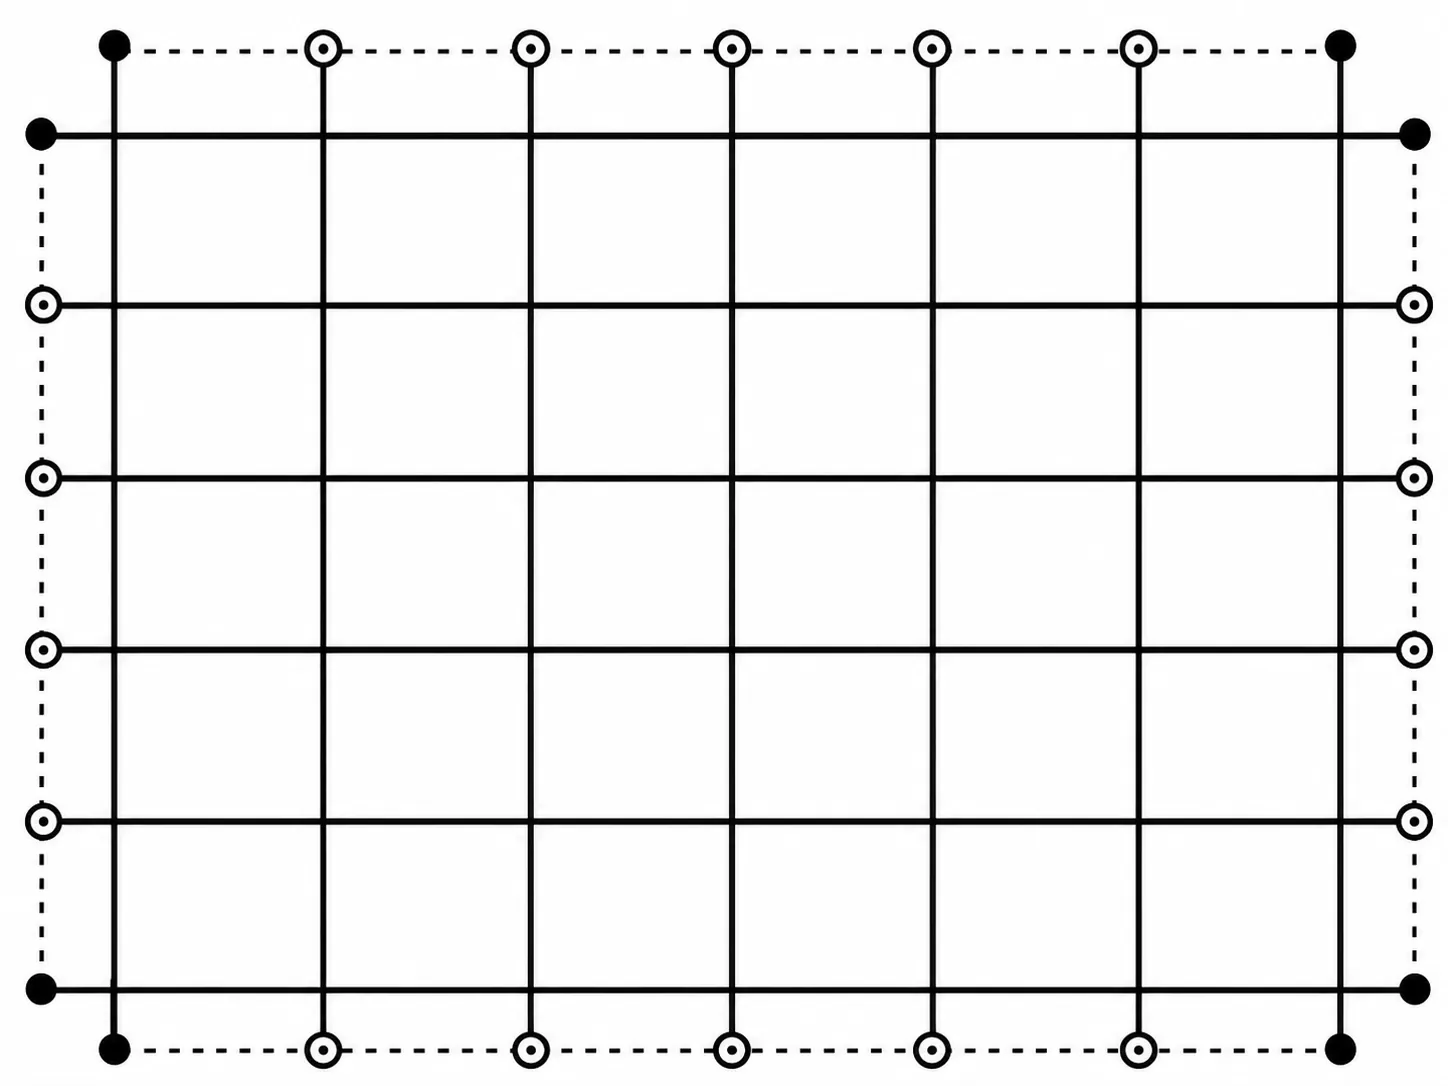
3. Install Side Anchors
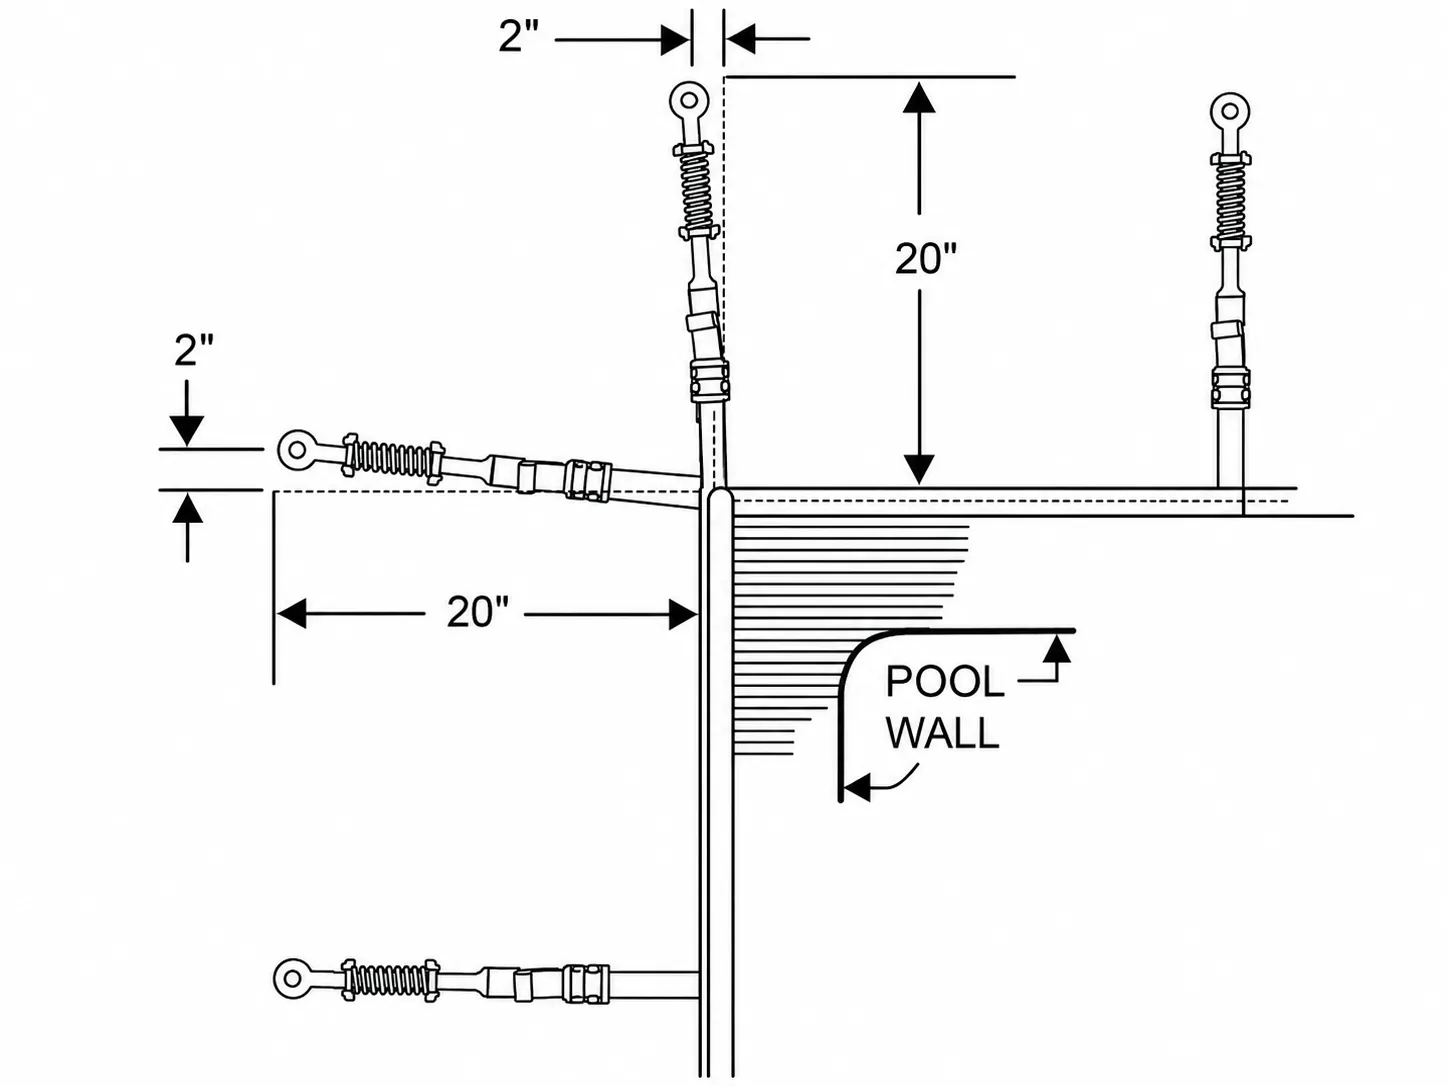
4. 2" Outward Offset
How to Install a Freeform Pool Cover
- To hold cover in position, place water tubes or buckets on select straps. DO NOT put weights directly on cover material.
- Start by positioning cover around obstructions and cut-outs (rocks, rails, raised walls, etc.).
- Locate center strap (A-B) and attach springs taking special care to ensure equal overlap. Repeat for C&D in the direction across pool width.
- Check overlap around the pool again. (Subtract pool size from cover size and divide by 2).
- Anchors should be 22” back from the cover’s edge.
- While pulling the straps straight away from the cover, continue to install the remaining anchors. Locate Anchors 22” from the cover’s edge.
- Check to be sure that all the cross webbing and straps are straight. Adjust tension (through D-Rings) if necessary.
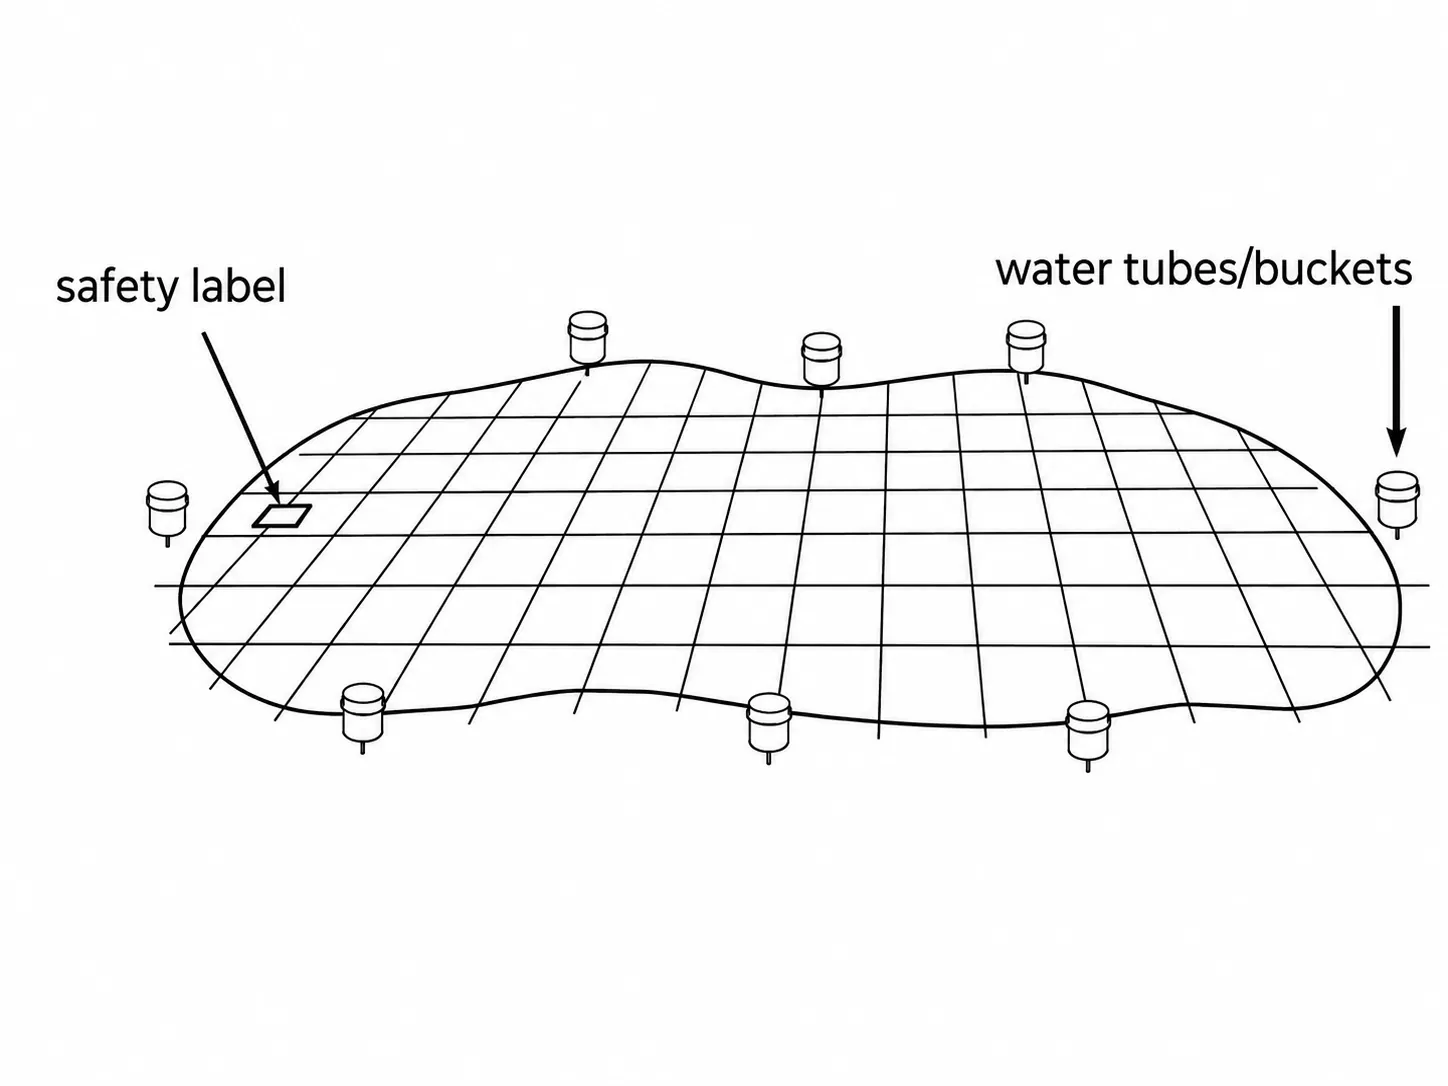
1. Initial Layout & Water Tubes/Buckets
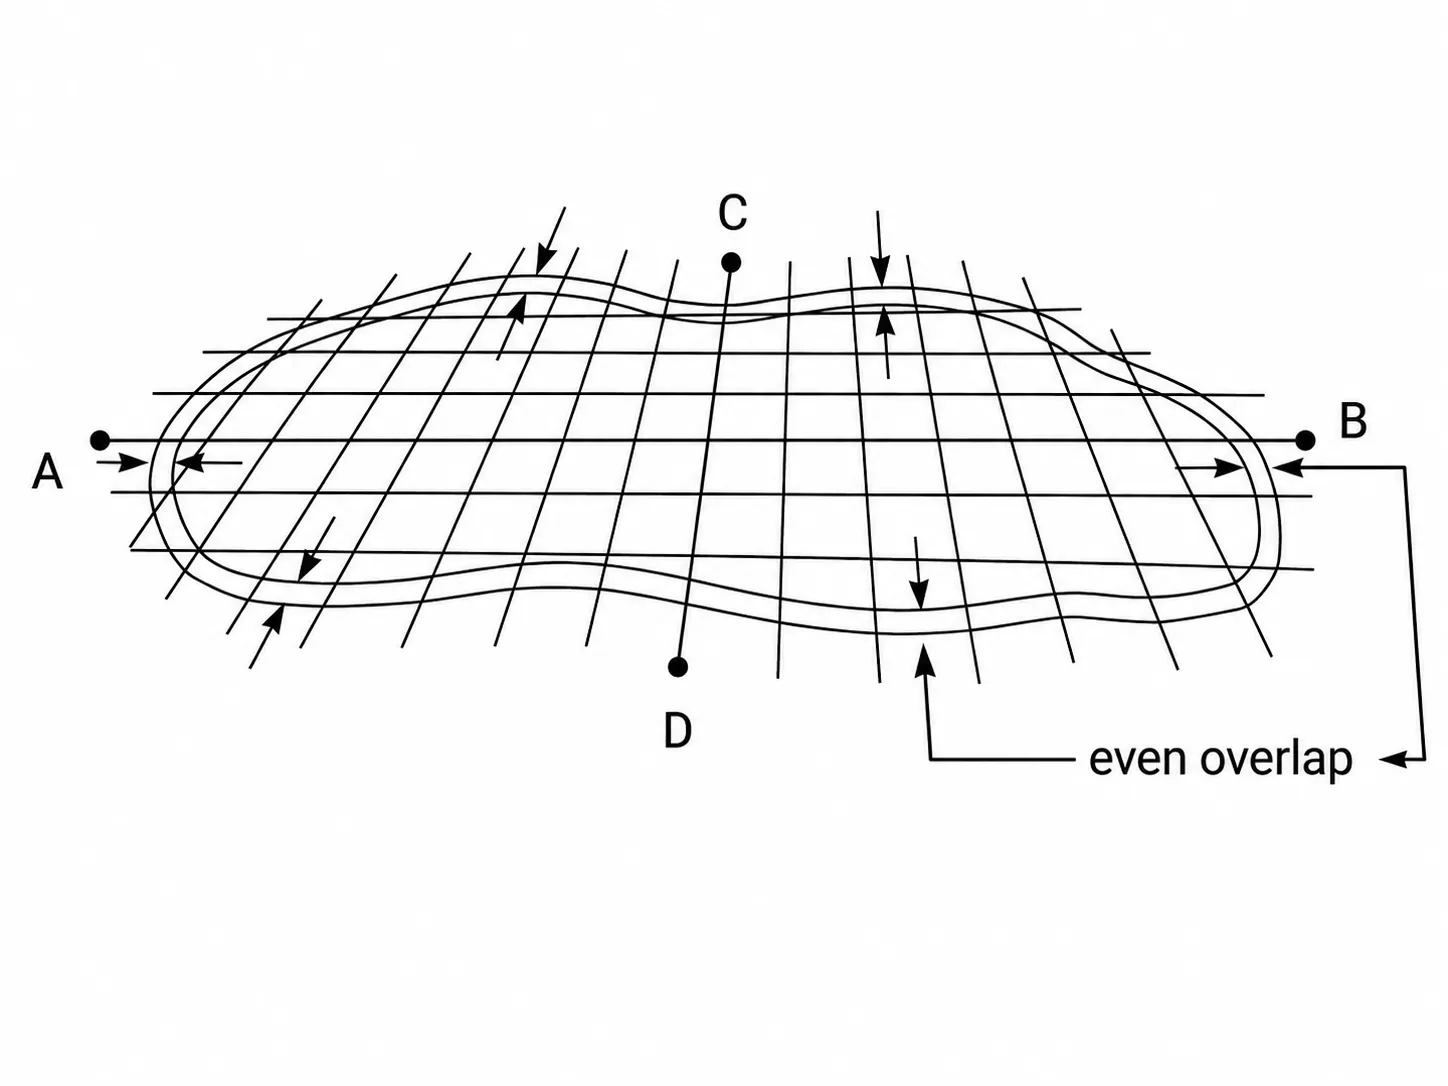
2. Center Line A-B and C-D Installation
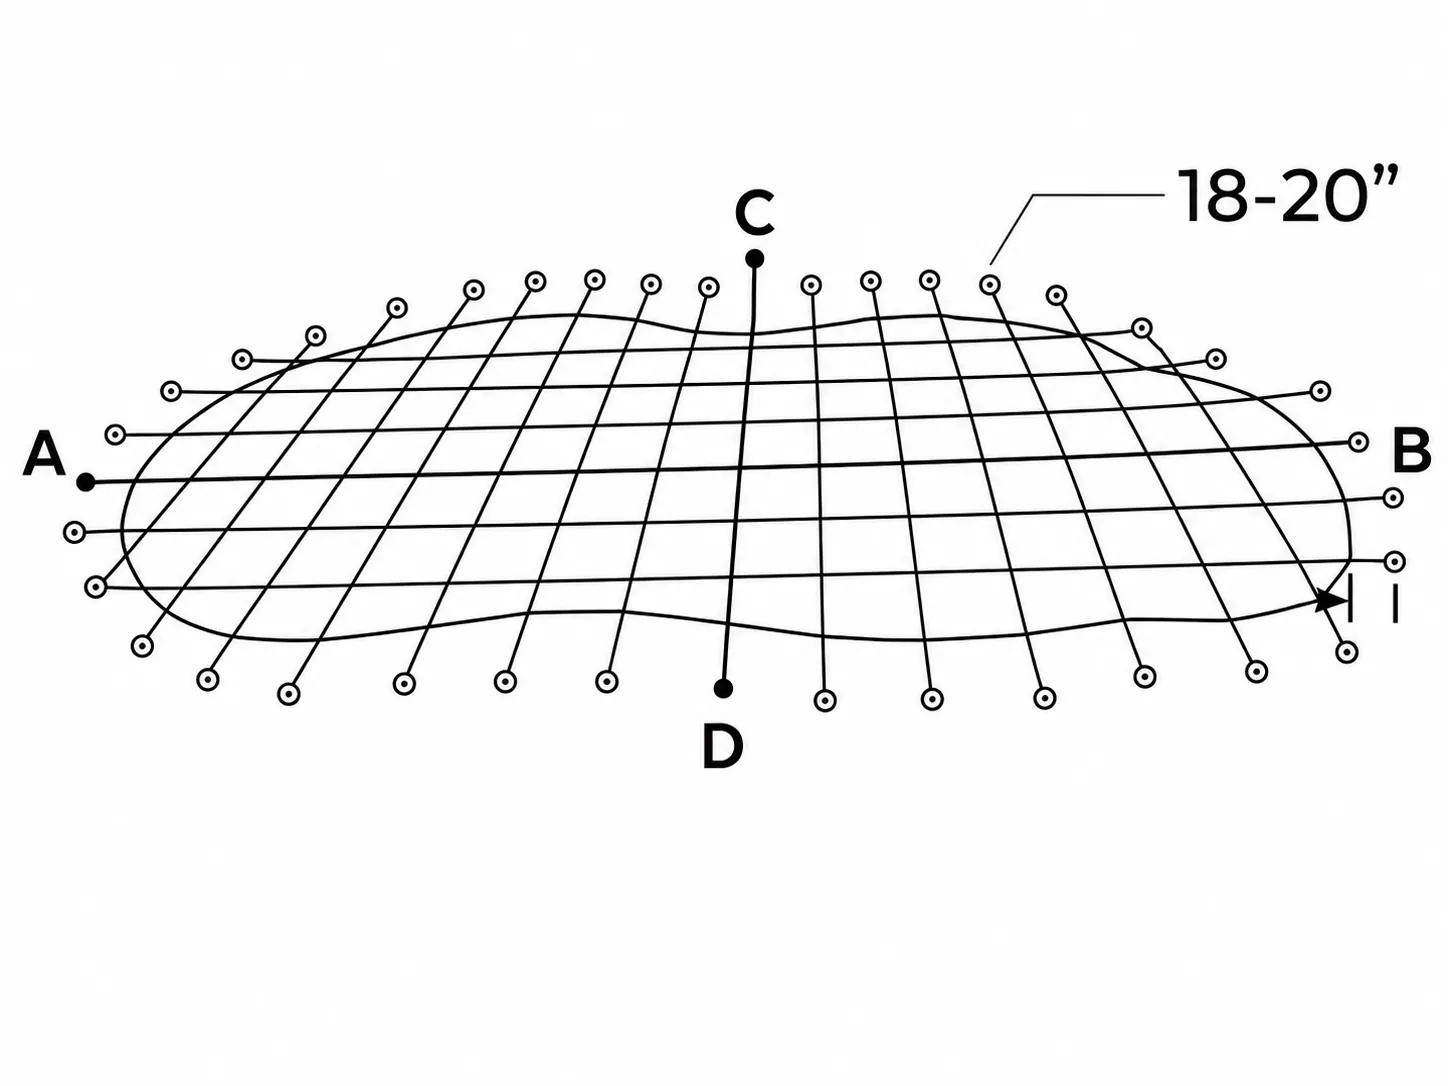
3. Final Perimeter Offset & Tensioning
Attaching Springs to Anchors
- Unscrew anchors using the hex key and insert the installation rod through the loop end of the spring.
- Position installation rod over the end of the anchor head. The tip on the rod should be away from the pool and the rod should be angled toward the pool.
- While pulling the rod handle away from the pool, step down on the spring and it will slide down to the bottom of the rod.
- Twist the tip towards the pool and the rod will be easily removed and ready for the next spring/anchor combination.
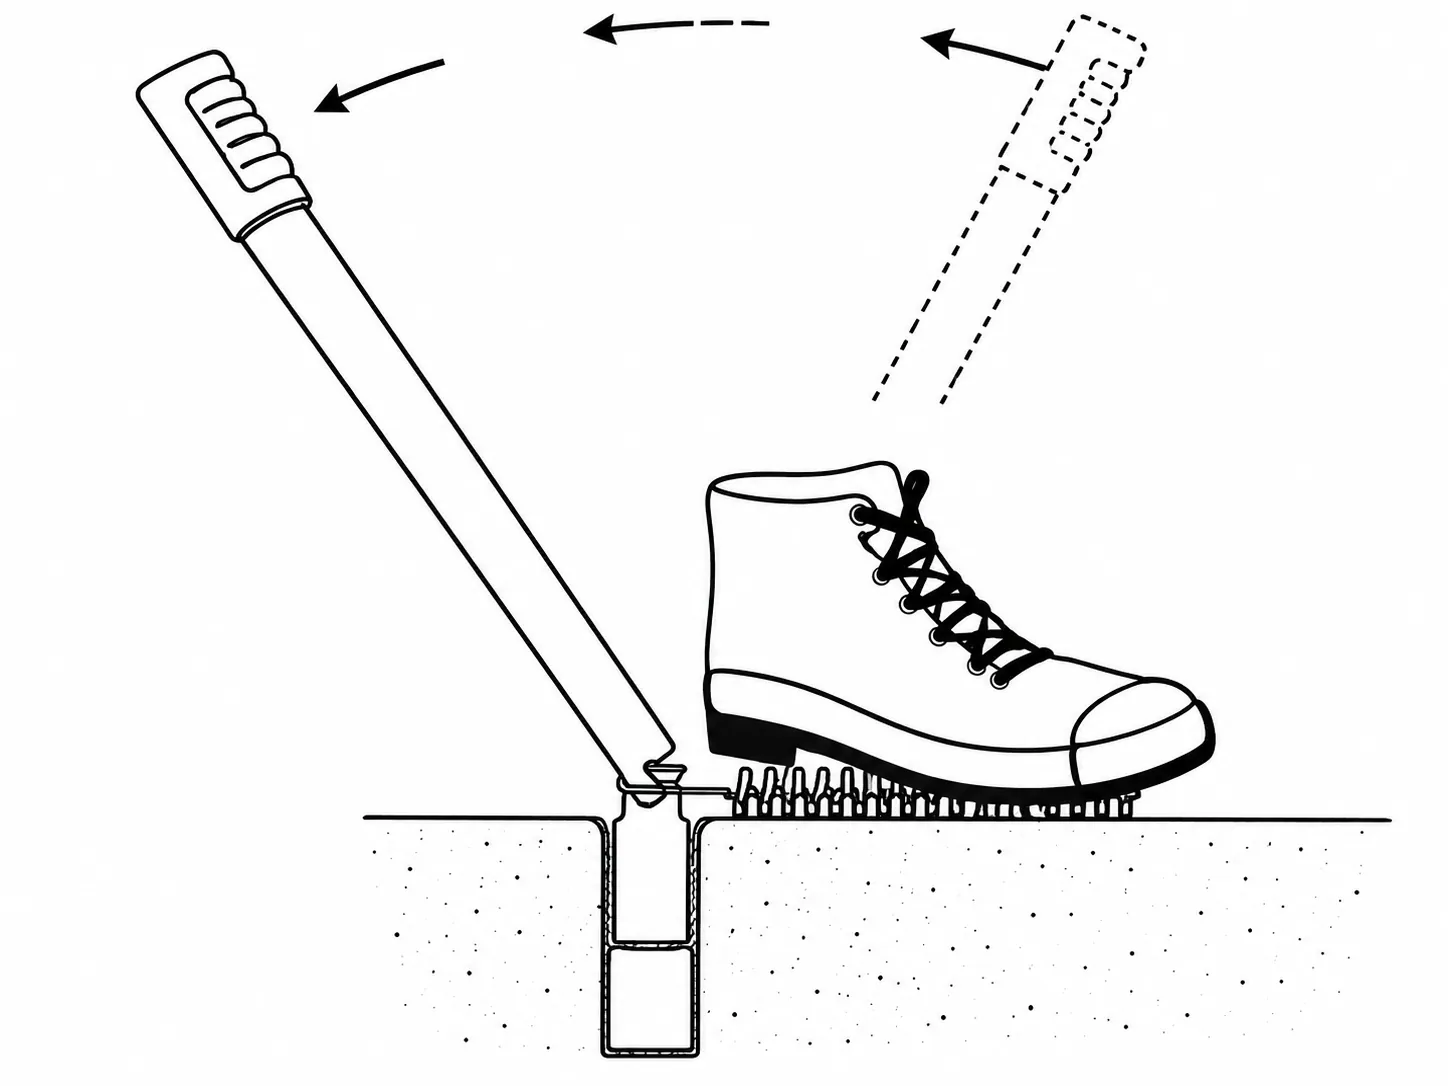
Preferred Attachment Sequence
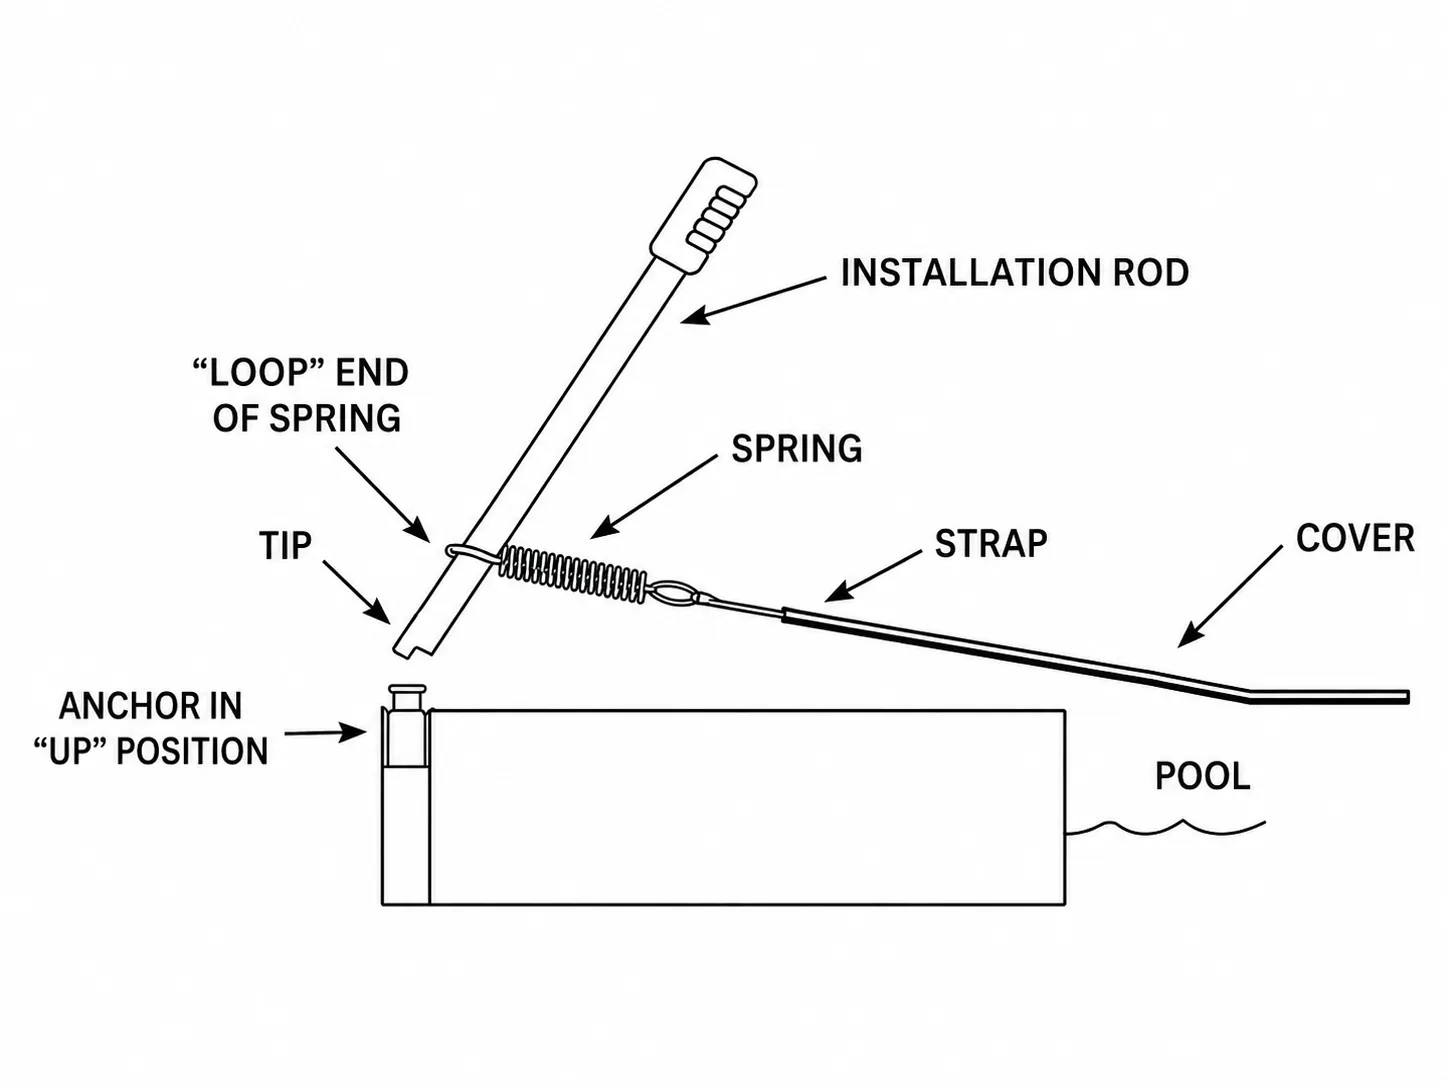
Assembly Detail
Adjusting Proper Cover Tension
The cover should now be “drum tight”. A loose cover will allow the wind to move it which may result in coping wear on the fabric around the edge. At initial installation we suggest that the cover be set extremely taut by adjusting straps to a position where the cover tension will have the spring coils almost touching. As the cover stretches slightly, tension will lessen and springs should adjust to their normal position. Check cover tension periodically for proper compression.
Removing the Cover
- Insert the installation rod so that the tip is towards the pool.
- Rotate the rod so that the tip is now opposite the pool and between the spring loop and the brass anchor.
- Tilt the rod towards the pool and the spring will slide up the strap. The spring on the opposite side of the strap should now be easily removed.
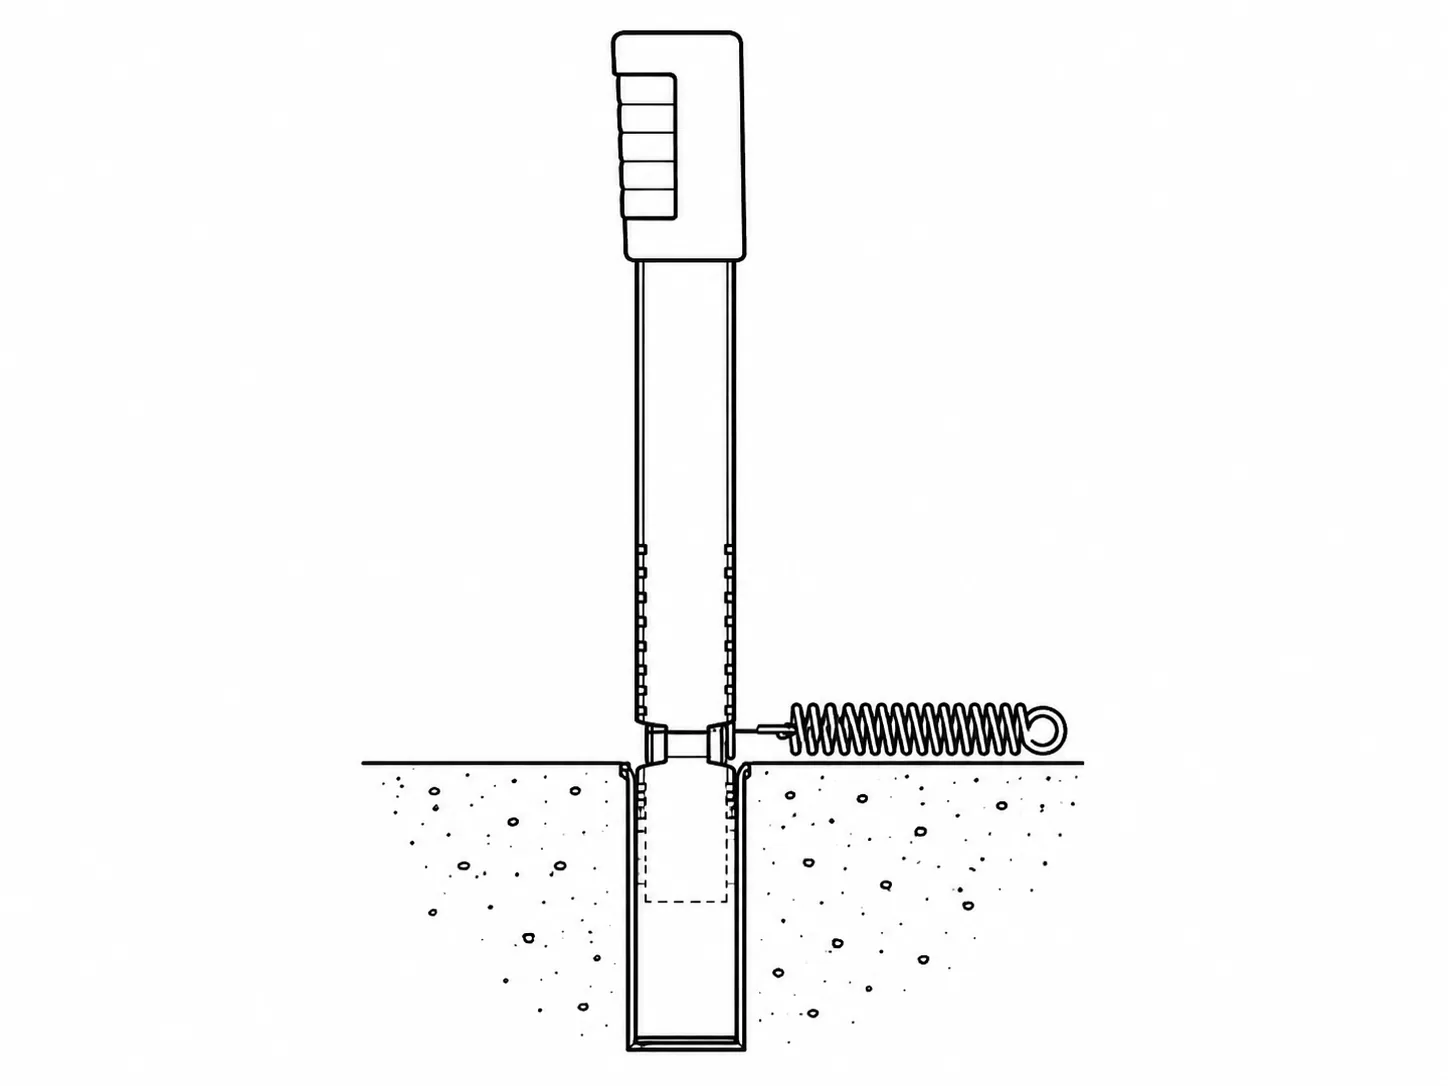
1. Insert Rod
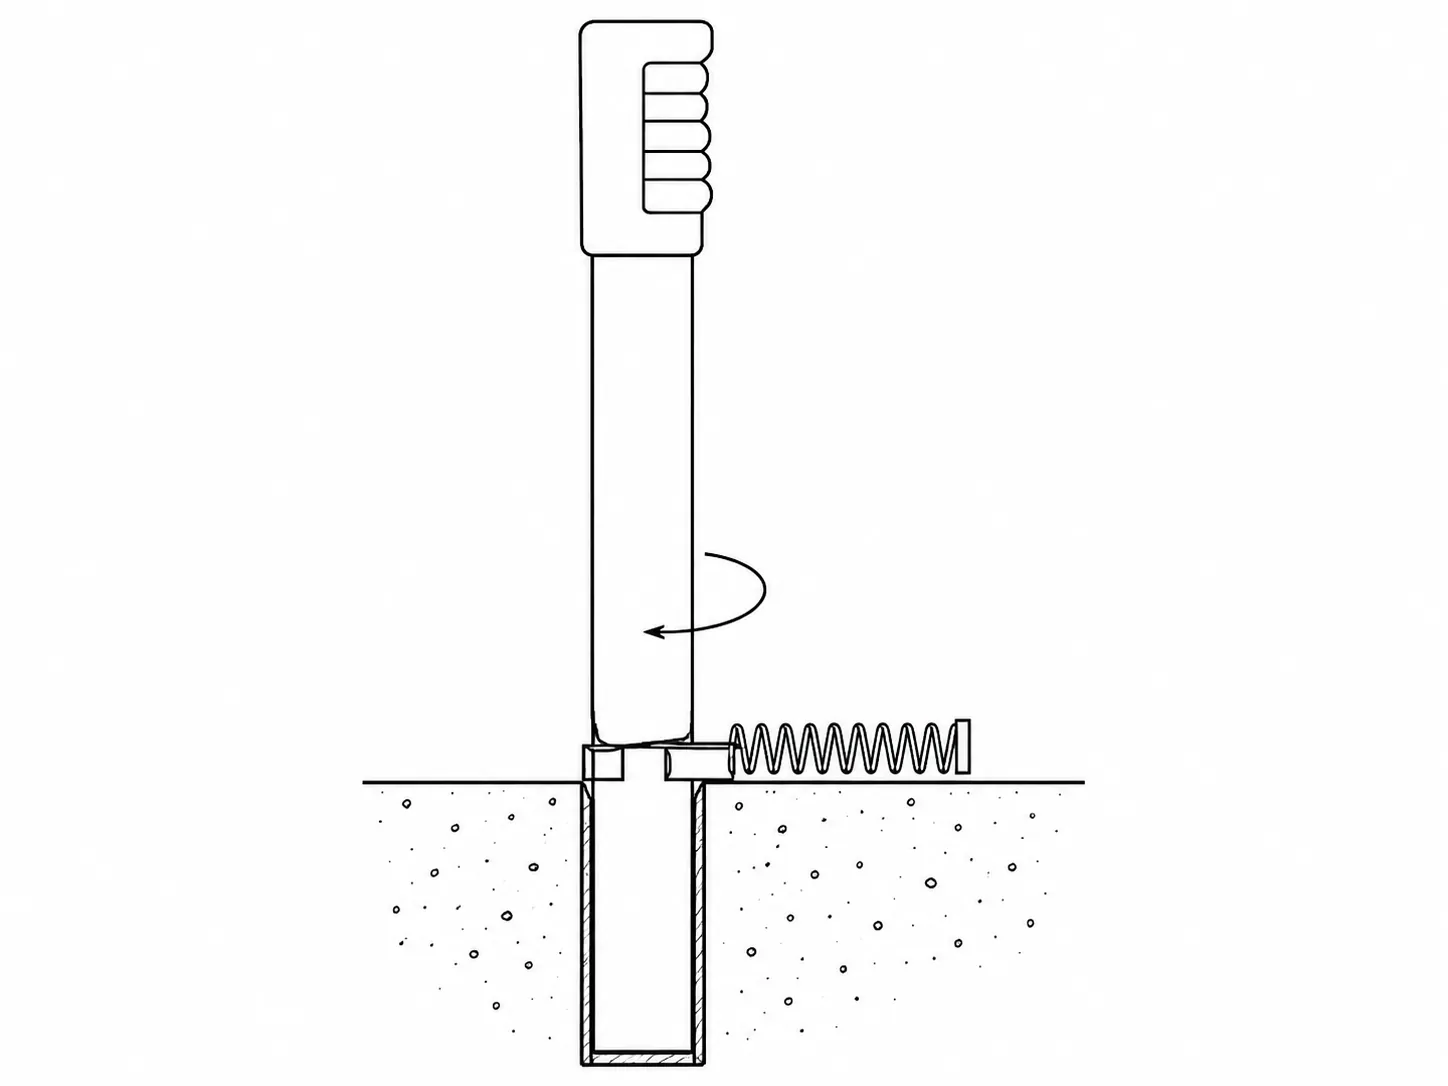
2. Rotate Rod
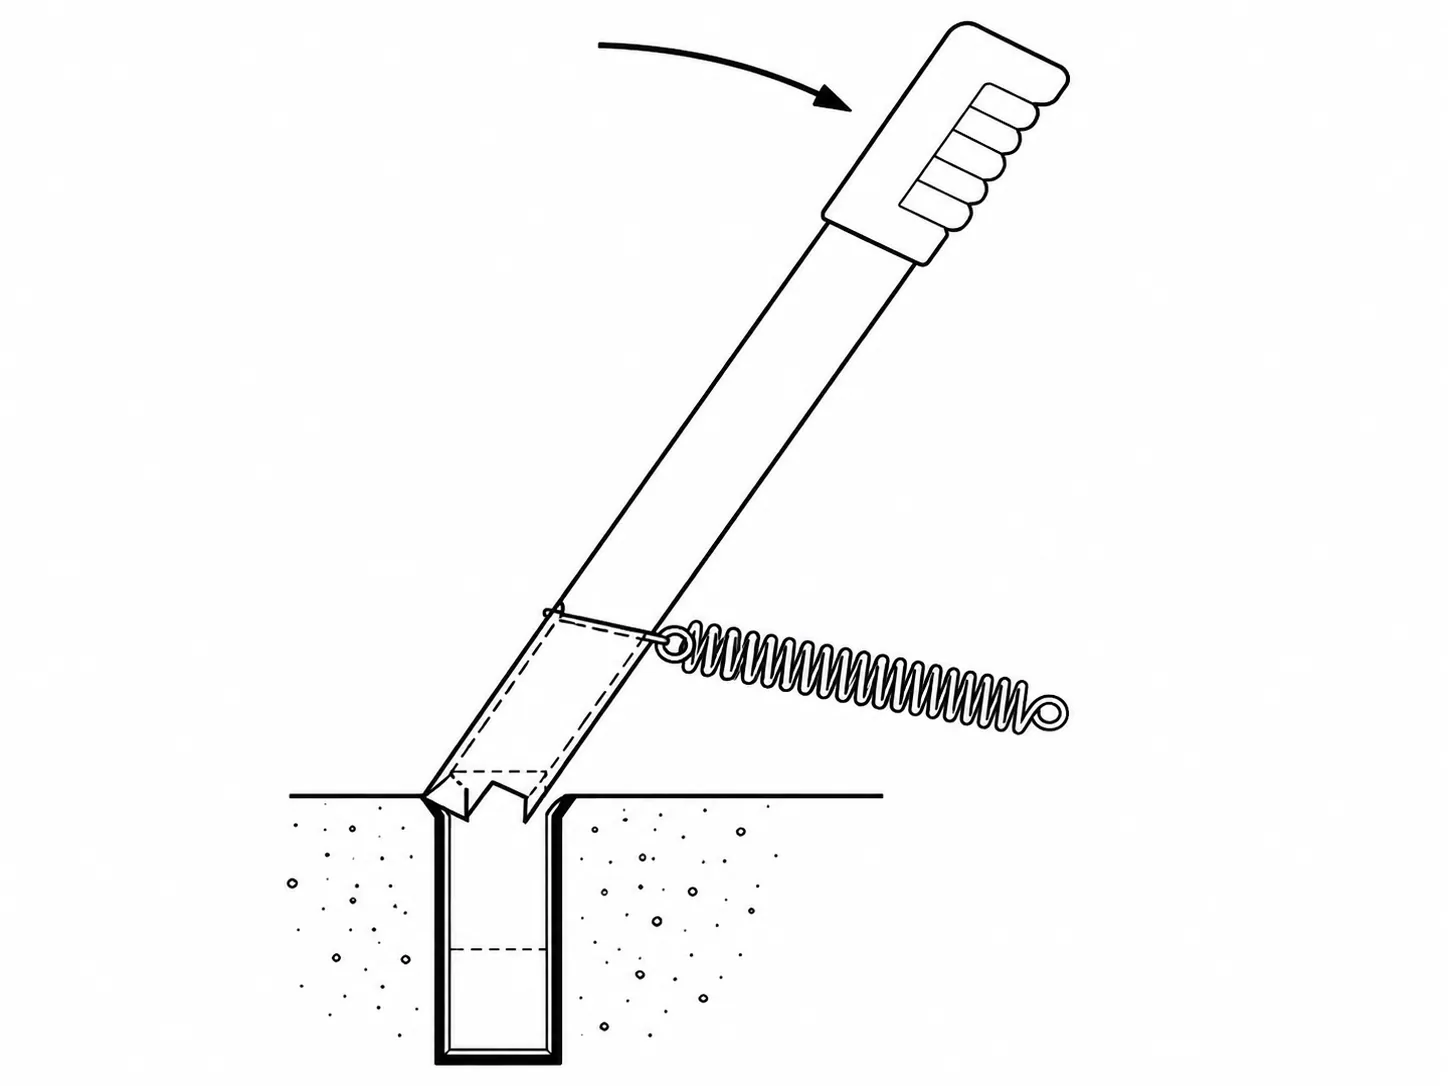
3. Tilt & Slide
Use, Care, and Storage
Water Level and Pool Chemistry
- Maintain the pool water level within 10 inches of the main deck level. A low water level will result in cover and/or spring damage during periods of snow accumulation. This damage will not be covered under the warranty.
- The pool water must be balanced and properly chemically treated when closing the pool for the winter. The water chemical level should be checked in early spring or when there is any period of warm temperature. Proper adjustment of chemicals should be made if necessary.
Important Use Requirements
- Do not walk on the cover except in an emergency. It should not be jumped upon like a trampoline. Walking or jumping on the cover may result in damage to the cover not covered by the warranty.
- Always completely remove the cover when using the pool. Never swim in the pool with the cover partially installed.
- Do not operate a barbeque grill in the proximity of the cover as sparks or hot ash may settle on the cover and result in small burn holes.
- Installers and companies should instruct the homeowner of the results of water on the cover, how to siphon excess in a power outage, or adding a secondary (backup) pump to remove water.
- Solid covers must have a properly-functioning automatic cover pump properly installed on the cover when installed on the pool.
Wear Prevention
- Abrasion strips are sewn to the cover to protect against normal coping wear. The cover should be kept drum tight to help lessen the chance of excessive wear not covered under the warranty.
- It is the responsibility of the installer to, when necessary, add protective padding to sharp corners or very rough areas of the pool. Padding or carpet remnants may be used for such protection.
- Check the cover periodically to be sure the cover is secured drum-tight on the pool. Adjust the strap positions to achieve the proper tension.
- Be careful not to drag the cover on decking or over the cover springs. Tears resulting from mishandling will not be covered under the warranty.
Cleaning and Storage
- The cover should be folded and stored in its storage bag when not in use. Leaves and debris should be removed. The mesh cover material does not require that it be scrubbed down or powdered prior to storage.
- Solid and mesh covers should be cleaned with a mild detergent and dried prior to storage.
- The cover should be stored in an area free of rodents.